This example focuses on the contact form functionality within a Laravel application(Updated).
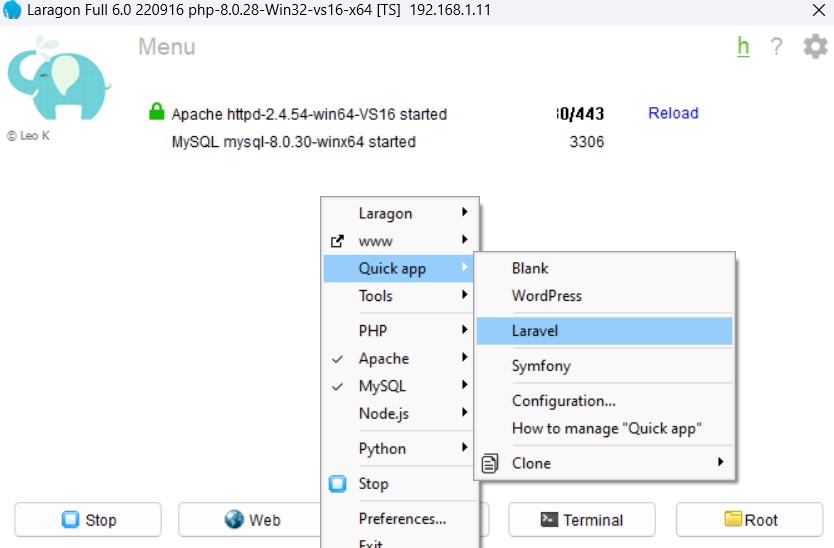
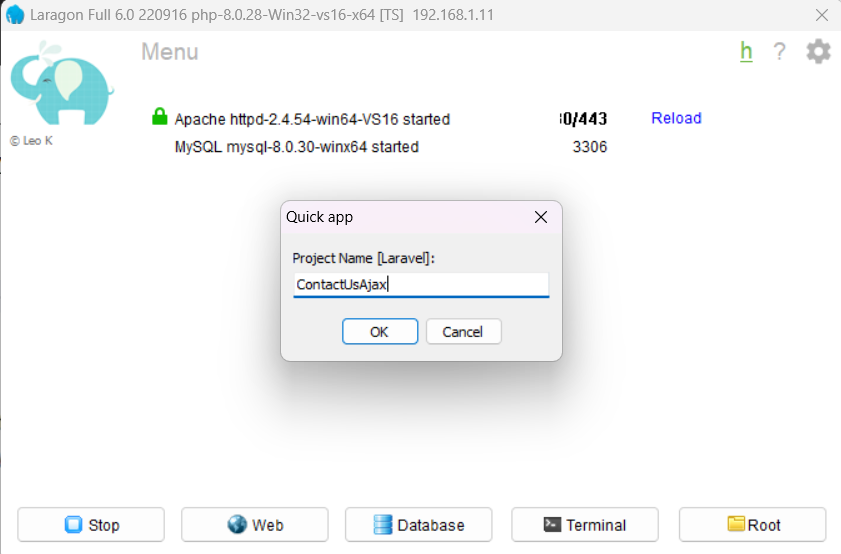
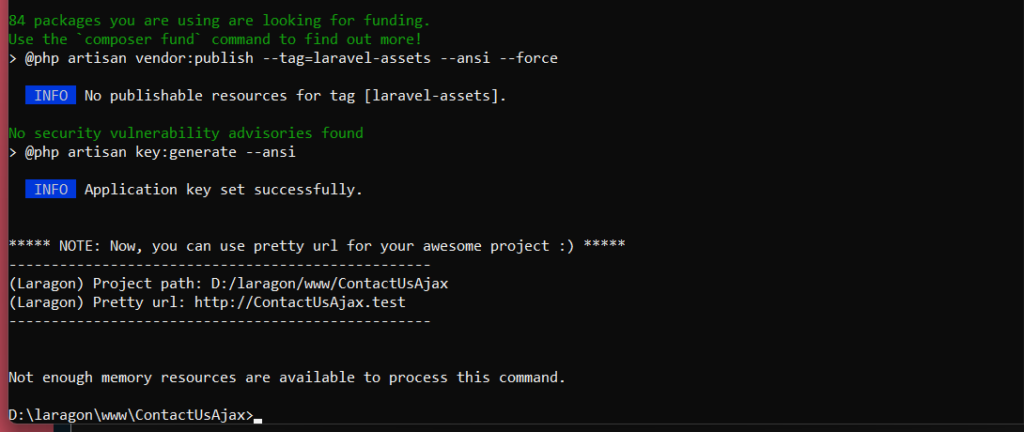
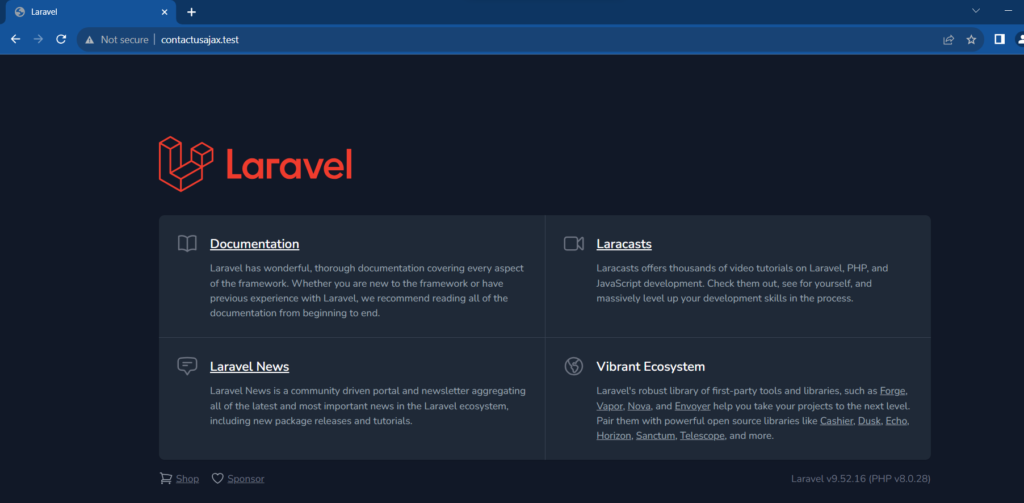
Step 1: Create a Laravel Project
Step 2: Create a Database and Configure .env
Step 3: Create a Database Table
Step 4: Create a Controller
Step 5: Define Routes
Step 6: Create Blade Views
Step 7: Add JavaScript Ajax
Step 8: Create Mail Notifications
Step 9: Configure Mail Settings
Step 10: Styling and Additional Features
Step 1: Create a Laravel Project
Assuming you have Laravel installed, you can create a new Laravel project using the following command:
laravel new ContactUsBlog
Replace ContactUsAjax with your preferred project name.
Or By Laragoan
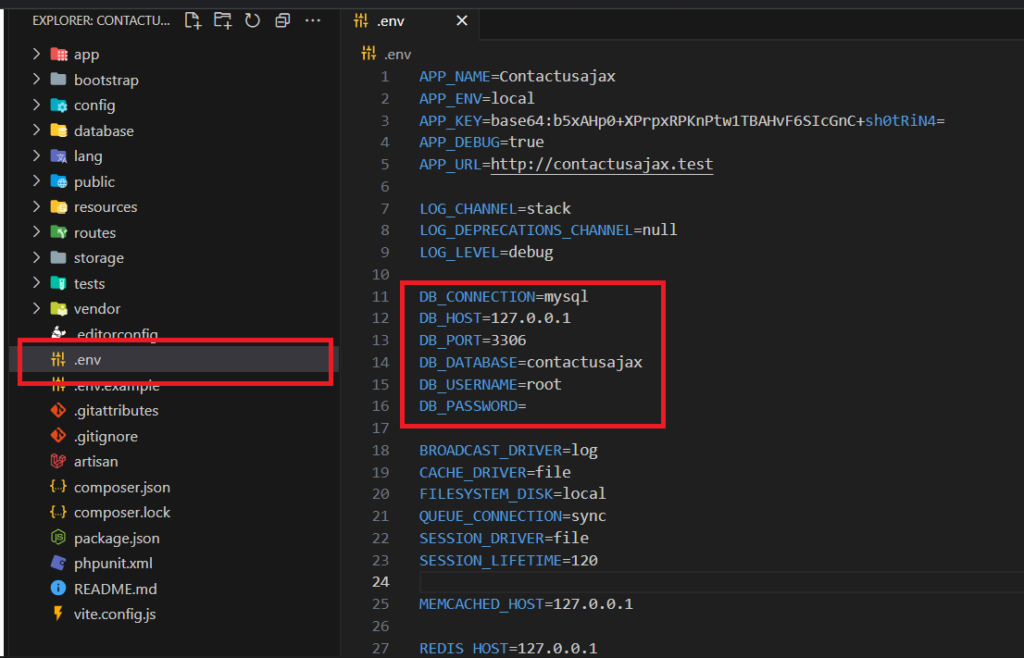
Step 2: Create a Database and Configure .env
Create a database for your project and configure the database connection settings in the .env file, including the DB_DATABASE, DB_USERNAME, and DB_PASSWORD values.
Step 3: Create a Database Table
Create a migration and model for the contacts table using Artisan commands:
php artisan make:model Contact -m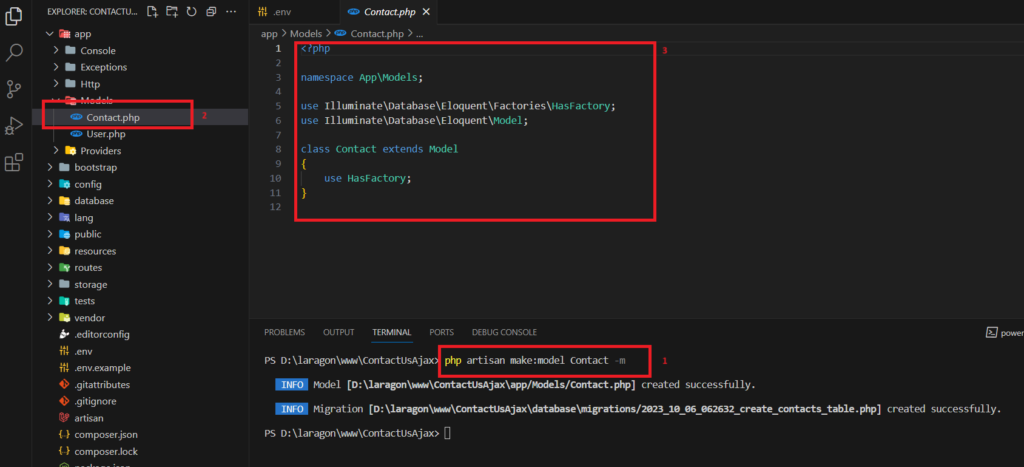
This will generate a model in the app/Models directory and a migration file in the database/migrations directory. You can update the migration file to define the table structure as shown in your original migration code:
// In the generated migration file
<?php

use Illuminate\Database\Migrations\Migration;
use Illuminate\Database\Schema\Blueprint;
use Illuminate\Support\Facades\Schema;

return new class extends Migration
{
    /**
     * Run the migrations.
     *
     * @return void
     */
    public function up()
    {
        Schema::create('contacts', function (Blueprint $table) {
            $table->id();
            $table->string('name');
            $table->string('email');
            $table->string('phone');
            $table->string('subject');
            $table->text('message');
            $table->timestamps();
        });
    }

    /**
     * Reverse the migrations.
     *
     * @return void
     */
    public function down()
    {
        Schema::dropIfExists('contacts');
    }
};
Update Contact Model

<?php

namespace App\Models;

use Illuminate\Database\Eloquent\Factories\HasFactory;
use Illuminate\Database\Eloquent\Model;

class Contact extends Model
{
    use HasFactory;
    public $fillable = [
        'name', 'email', 'phone', 'subject', 'message'
    ];

}
Then, run the migration to create the table:
php artisan migrate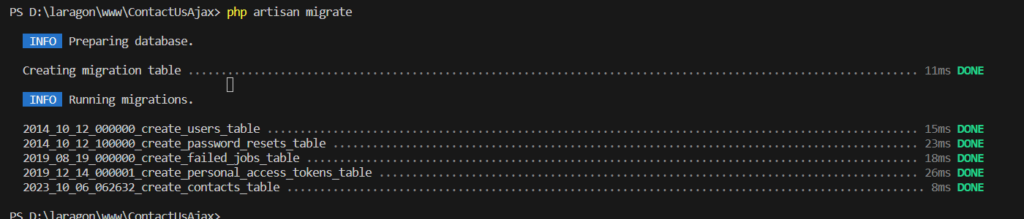
Step 4: Create a Controller
Create a controller to handle the contact form functionality:
php artisan make:controller Frontend/HomeController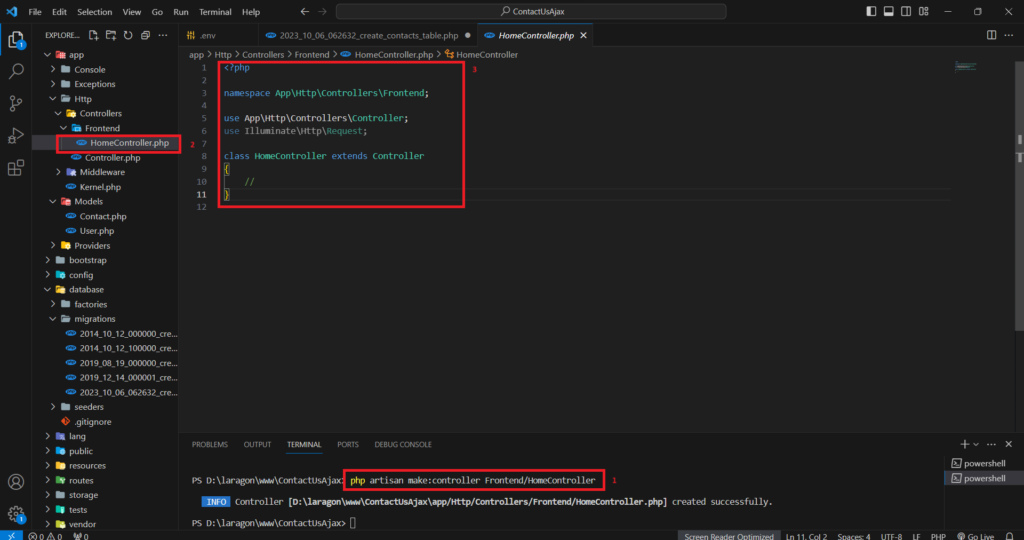
In the generated HomeController.php file, add the contactForm and storeContactForm methods
<?php
namespace App\Http\Controllers\Frontend;
use App\Http\Controllers\Controller;
use Illuminate\Http\Request;
use App\Models\Contact;
use Illuminate\Support\Facades\Validator;
class HomeController extends Controller
{
public function contactForm() // no use in spa
{
return view('contactForm'); // not implemented
}
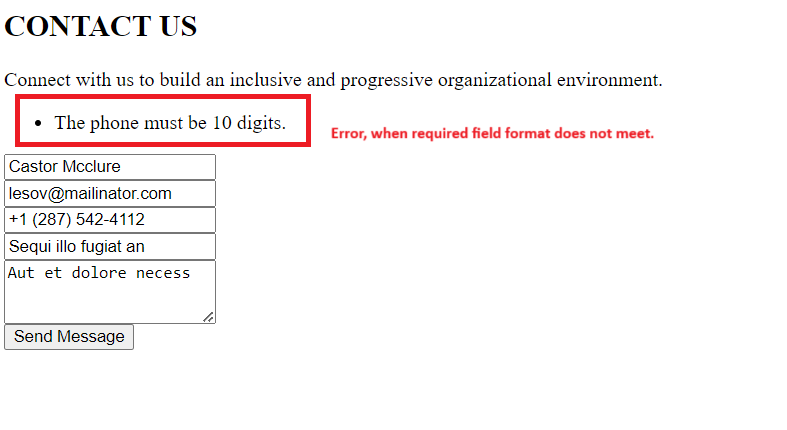
public function storeContactForm(Request $request)
{
$validator = Validator::make($request->all(), [
'name' => 'required',
'email' => 'required|email',
'phone' => 'required|digits:10',
'subject' => 'required',
'message' => 'required',
]);
if (!$validator->passes()) {
return response()->json(['error' => $validator->errors()->all()]);
}
try {
$contact = new Contact;
$contact->name = $request->name;
$contact->email = $request->email;
$contact->phone = $request->phone;
$contact->subject = $request->subject;
$contact->message = $request->message;
$contact->save();
$data = array(
'name' => $request->name,
'email' => $request->email,
'phone' => $request->phone,
'subject' => $request->subject,
'message' => $request->message,
'attachement' => $input['attachement'] ?? 'default.jpeg',
);
return response()->json(['success' => 'Your message has been sent. Thank you!']);
} catch (\Exception $e) {
return response()->json(['success' => 'Try after sometime. Thank you!']);
}
}
}
Step 5: Define Routes
Define the routes in the routes/web.php file:
use App\Http\Controllers\Frontend\HomeController;

Route::get('/contact-form', [HomeController::class, 'contactForm'])->name('contact-form');
Route::post('/contact-form', [HomeController::class, 'storeContactForm'])->name('contact-form.store');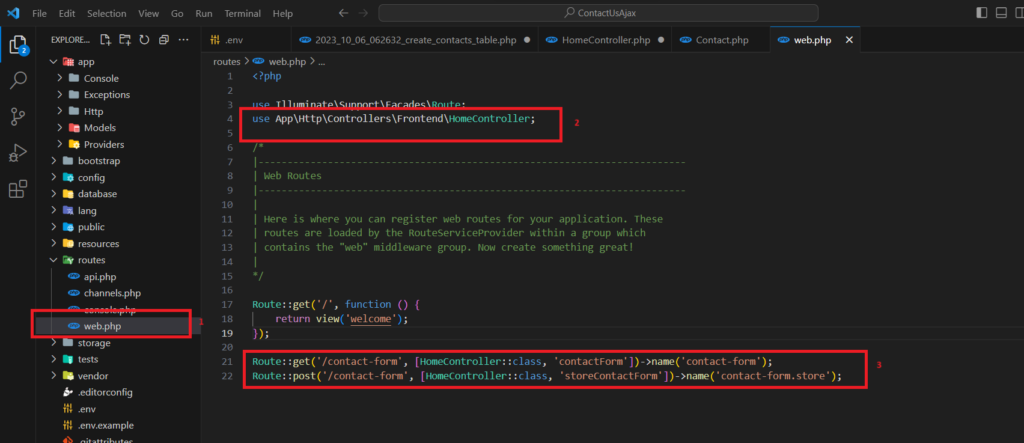
These routes include a home page and the contact form routes.
Step 6: Create Blade Views
Create Blade views for the home page and contact form. You can place these views in the resources/views directory:
resources/views/contact-form.blade.php(for the contact form)
In the contact form view, include the form HTML.
<main>
<section id="contact" class="contact">

<div class="container" data-aos="fade-up">
    <div class="section-title">
        <h2>CONTACT US</h2>
        <p>Connect with us to build an inclusive and progressive organizational environment.
        </p>
    </div>
    <div class="row">
        <div class="col-lg-6">
            <div class="alert alert-danger print-error-msg" style="display:none">
                <ul></ul>
            </div>
            <form id="contactus">
                {{ csrf_field() }}
                <div class="form-group">
                    <input placeholder="Your Name" type="text" name="name" class="form-control" id="name"
                    value="{{ old('name') }}" autocomplete="off" required
                    >
                    <small></small>
                    @if ($errors->has('name'))
                    <span class="text-danger">{{ $errors->first('name') }}</span>
                    @endif
                </div>

                <div class="form-group mt-3">
                    <input placeholder="Your Email" type="email" class="form-control" name="email" id="email"
                    value="{{ old('email') }}" autocomplete="off" required
                    >
                    <small></small>
                    @if ($errors->has('email'))
                    <span class="text-danger">{{ $errors->first('email') }}</span>
                    @endif

                </div>

                <div class="form-group mt-3">
                    <input type="text" pattern="[1-9]{1}[0-9]{9}" maxlength="10" name="phone" id="phone"
                    class="form-control" placeholder="10 digits" autocomplete="off"
                    value="{{ old('phone') }}" required
                    >
                    <small></small>
                    @if ($errors->has('phone'))
                    <span class="text-danger">{{ $errors->first('phone') }}</span>
                    @endif

                </div>

                <div class="form-group mt-3">
                    <input type="text" name="subject" id="subject" class="form-control" placeholder="Subject"
                    value="{{ old('subject') }}"
                    >
                    <small></small>
                    @if ($errors->has('subject'))
                    <span class="text-danger">{{ $errors->first('subject') }}</span>
                    @endif
                </div>

                <div class="form-group mt-3">
                    <textarea placeholder="Message" name="message" id="message" rows="3"
                    class="form-control">{{ old('message') }}
                    </textarea
                    >
                    <small></small>
                    @if ($errors->has('message'))
                    <span class="text-danger">{{ $errors->first('message') }}</span>
                    @endif

                </div>
                <div class="my-3">
                    <div class="alert alert-success print-sending-msg" style="display:none">
                        <ul></ul>
                    </div>
                </div>

                <div class="my-3">
                    <div class="alert alert-success print-success-msg" style="display:none">
                        <ul></ul>
                    </div>
                </div>
                <div class="text-center"><button type="submit" class="btn btn-success btn-submit">Send Message</button></div>
            </form>
        </div>
    </div>
</div>
</section>
<main>
Step 7: Add JavaScript
In your contact form view (contact-form.blade.php), include the JavaScript code to handle form submission via AJAX.
<script src="https://cdnjs.cloudflare.com/ajax/libs/jquery/3.6.0/jquery.min.js" integrity="sha512-894YE6QWD5I59HgZOGReFYm4dnWc1Qt5NtvYSaNcOP+u1T9qYdvdihz0PPSiiqn/+/3e7Jo4EaG7TubfWGUrMQ==" crossorigin="anonymous" referrerpolicy="no-referrer"></script>
<script type="text/javascript">
    $(document).ready(function() {
        $(".btn-submit").click(function(e) {
            e.preventDefault();

            var _token = $("input[name='_token']").val();
            var name = $("input[name='name']").val();
            var email = $("input[name='email']").val();
            var phone = $("input[name='phone']").val();
            var subject = $("input[name='subject']").val();
            var message = $("textarea[name='message']").val();


            printSendingMsg('Sending Message...')
            $.ajax({
                url: "{{ route('contact-form.store') }}",
                type: 'POST',
                data: {
                    _token: _token,
                    name: name,
                    email: email,
                    phone: phone,
                    subject: subject,
                    message: message
                },

                success: function(data) {
                    if ($.isEmptyObject(data.error)) {
                        // alert(data.success);

                        printSuccessMsg(data.success,3000);
                    } else {

                        printErrorMsg(data.error);
                    }
                }
            });

        });

        function printErrorMsg(msg) {
            $(".print-error-msg").find("ul").html('');

            $(".print-success-msg").css('display', 'none');
            $.each(msg, function(key, value) {
                $(".print-error-msg").find("ul").append('<li>' + value + '</li>');
            });

            setTimeout(function() {
                    $('.print-sending-msg').css('display', 'none');
                    $(".print-error-msg").css('display', 'block');
                }, 2000);
        }

        function printSendingMsg(msg) {

            $(".print-sending-msg").css('display', 'block');
            $(".print-sending-msg").find("ul").html('');
            $(".print-sending-msg").find("ul").append('<li>' + msg + '</li>');
            document.querySelectorAll('.form-group').forEach(function (elem) {
	            elem.classList.remove('success');
            });

        }

        function printSuccessMsg(msg, time) {

            $(".print-success-msg").find("ul").html('');
            $(".print-error-msg").css('display', 'none');
            $(".print-sending-msg").css('display', 'none');

            // $.each( msg, function( key, value ) {
            $(".print-success-msg").find("ul").append('<li>' + msg + '</li>');
            $(".print-success-msg").css('display', 'block');

            setTimeout(function() {
                    $('.print-success-msg').fadeOut('fast');
                }, 4000);
            $("input[name='name']").val('');
            $("input[name='email']").val('');
            $("input[name='phone']").val('');
            $("input[name='subject']").val('');
            $("textarea[name='message']").val('');
            // });
        }

    });
</script>
Front end view

Step 8: Create Mail Notifications
Create mail notifications for sending email notifications when a contact form is submitted. You can use the php artisan make:mail command to generate mail classes.
Step 9: Configure Mail Settings
Configure your email settings in the .env file, specifying the mail driver, host, username, password, etc.
Step 10: Styling and Additional Features
To make your blog more complete, you can add styling, authentication, user registration, and additional features as needed.
Remember that this is a simplified example. In a real-world scenario, you might want to use Laravel’s authentication scaffolding, create separate views for listing and displaying blog posts, and implement user management features.
Once you’ve completed these steps, you should have a basic blog with a contact form that allows users to submit messages, which are saved to the database, and email notifications are sent to specified recipients.
Please note that developing a full-fledged blog with all the features and best practices can be a substantial project, and this example is intended as a starting point.